Saturday, August 20, 2011

Pennsic 2011- House 2.0


I’m sure many bloggers start off with frequent post intending on keeping the pace up, only to find enthusiasm waning. I have meant to post bits on other artists and techniques, but alas I too have fallen victim. So, now that the improvements to my Pennsic house are complete, I’ll endeavor to post more often. To start off:

The conclusion of Pennsic house 2.0

After a long drive from LA to Pennsylvania (41 hours). We arrived and started set up on Monday morning. Tuesday night I was sleeping in my bed. Being only the second time for a full set up on location, I was pleased with the set up time, but I’m still sure it can be done in one day. This year due to a land dispute, the house had to be set up perpendicular to the lake; as a result, I had a lovely view of plastic tents! Hopefully next year this can be rectified and the house can be set up in its designed location facing the lake.

I’d like to thank the folks that came by to help with set up and strike, it was a big help. I hope for next Pennsic to have 3 full time people to help with set up and strike. (If you plan to be at Pennsic 41, keep this in mind, there could be pay involved!)

The crew setting the foundation:


Here we are assembling the second floor 2x10 perimeter boards.

Here I am setting the second floor beams in place.


The house has a new color scheme, which I like much better than the terra cotta color from last year and there are tapered columns and a proper balcony railing.


Inside there are a couple of pieces of furniture I built and a proper niche with a hanging cistern: forming an early type of sink for washing. It was very handy.


Due to the new house location, we swapped a wall panel, resulting in a window in the stairway.

Upstairs I added proper draperies to the bed and a wardrobe.

My new view :(

Hopefully my view next year.


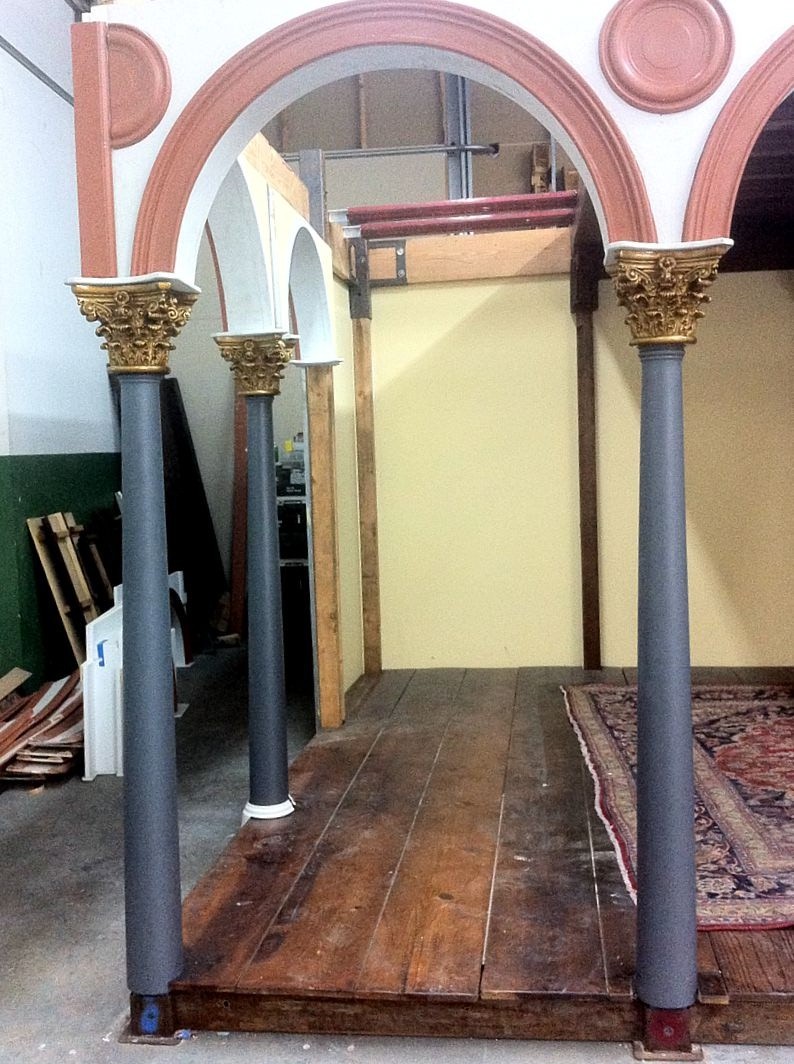
Another small project for this year was to build new arcades for the front portion of Casa Bardicci.


We struck the house, packed it in its trailer and left it at Coopers Lake till next year, hopefully any damp items will survive undamaged till next Pennsic.

Wednesday, May 4, 2011

It's all about packaging!

I have to come clean about something.... Many people have asked how I made the house and how it goes up so easy...
Well truth be told, I had some help.
In 2009 I found on eBay a building system originating in the 16th century; it was discovered in a warehouse in Venice. I bought it, and used for my Pennsic house. I have a feeling I’m not the first to discover this old system, I suspect others just changed the name a bit and modified the design of the pieces to better market them to the 20th century.
The pressure has been too much, so here is the secret. These are the crates I bought and now you know the secret.


In one crate I found these window pieces, they just "Snap" in!


Ok, not believing that story?
With some of the upgrades, I built some crates to store some of the elements of the house in to better protect the finish and I asked one of my guys to paint them when he had nothing else to do and I said color didn’t matter, just use some old paint we are likely not to use for something else. (The large crate is for the 5 windows and the other 3 crates are for the new columns)
The crated ended up in primary red and yellow and I remarked how they looked like industrial Lego kits.
So I made some labels more appropriate to the early 16th C.

Wednesday, April 6, 2011

Cupboard part 2

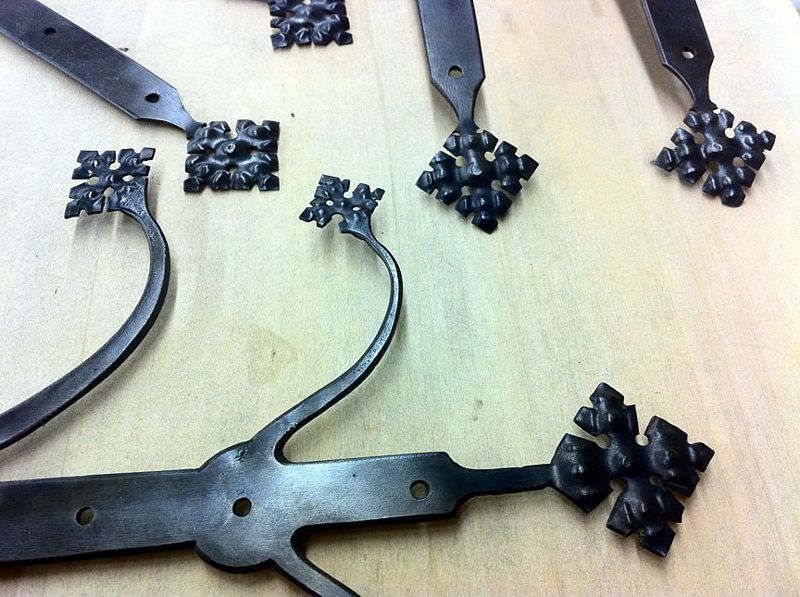
To make the hinge part, I made a press plate and using a vise;

I pressed a pin into the groove,

then heated the unformed part of the strap and closed them over the pin. Same for the other side and presto, hinges.
The decorations at the ends where made by first thinning the metal to about 16ga. And then using punches, I punched the "bumps" in from the back on a piece of lead. To finish the design, I made cuts with dykes, then using a torch to heat the steel to yellow hot a few times with a quench and wire bush in between, I was able to burn out the thinner cut edges left by the dykes and open up the cuts to match the look of the original.  I then tuned them up a little with a file and blackened them and applied a paste wax.


After making those I made the lock plates, although I stopped short of actually making locks for them.
For the final assembly of the cabinet, I needed dowel pins. Using a technique I learned from a traditional rake maker, I sharpened a steel tube that had the correct inside diameter and rough cut pine chunks and drove them through the sharpened tube. The result is nicely cut round pegs. These where driven into drilled hole bisecting the tennons and side panels. All glued with white glue.
The cupboard was made from Pine, but I wanted a darker look and so I used Mahogany leather dye and with an atomizer, sprayed the dye onto the finished cabinet. I then applied a urethane clear with a spray gun.
In order to save some time, I ordered some nails from  www.tremontnail.com (thanks for the tip) and tuned them up a little and finished the cupboard. Here is the result with the Keg “jockey box” on top.


However, I had so much fun making the first set of hinges, I made some others for some chest I bought at Pennsic 15 years ago. They looked too “modern” so I re-cut the lids and am going to add the fancy hinges. I may add these same “sprays” to the front and sides.

Wednesday, March 23, 2011

A 15th Century Cupboard

One of the things I was suppose to have for last year’s Pennsic was a correct period table for the “jockey box” keg in my house. In trade for a bunch of old furniture, I had arranged with a local furniture restorer/ maker to make it for me. He flaked. So I am making it myself. Here is what I was looking at. I may do some of the carving.

Saturday I did a drawing in Corel Draw and Sunday morning picked up some pine boards. Originally I had planned to “throw it together”, but I decided not to be so lazy and make it a little nicer. Now I’m not a wood worker, So if Peter Follansbee reads this, please don’t be too harsh. For those of you who don’t know Mr. Follansbee’s work, you should check out his blog, some amazing stuff. http://pfollansbee.wordpress.com/
Anyway, I don’t have a lot of woodworking tools and to cut my mortises, I used my Bridgeport mill. Nearly all of the other work was completed using a table saw, band saw, router and a compound miter saw. Working about 6 hours Sunday I got the frame completed. The board on top is a just for size. The real top is on the table in the background drying.

Monday morning I rabbitted the inside and lower shelves as well as the inside walls of the cabinet.  Here is the cupboard, just pressed together.  I still need to clean up the shoulders of the tenons before I glue it together and of course flush cut the tenons and sand them. But I'm pretty happy with the way it looks.

I now needed hardware. I have a very nice book that is filled with 19th C. etchings of 12th to 17th century ironwork. From latches and locks to gates and candlesticks. (I will get the title and publishing info and post it) I used a couple of examples in there to create the hinge design. I spent today making hinges.
Again, I first did a drawing in Corel and using 3M 77 spray adhesive I glued the printout to some 13 gauge mild steel. Using a band saw I rough cut these out.

I then center punched the holes and drilled them. Then did the final cut. Once cut, I sanded the profiles with a Burr King.

 The decorations at the ends where made by making cuts with dykes, then using a torch to heat the steel to yellow hot a few times with a quench and wire bush in between, I was able to burn out the thinner metal left by the dykes and open up the cuts to match the look of the original.
I then tuned them up a little with a file and blackened them and applied a paste wax. They are currently “tacked on” with small screws, but they will be eventually held with clinched nails. (which I’ll have to make)


Here are all 4 on the cupboard

 I still have the latch plates to make, but here is the cupboard in is designated place in the house.

Friday, March 18, 2011

Pennsic House 2.0

The original plan with my Pennsic house was to leave it at the Pennsic event site in storage. But I decided I had too many things I wanted to improve or change, so it was brought it back to California.
Well the time has come to start the upgrades.
First, I decided that PVC pipe over 4x4’s wasn’t doing it for me as columns. So I ordered tapered wooden columns and added the 4x4’s elements needed to plug into the houses frame system and bonded all the elements together using a urethane resin. I have also decided to change the color scheme of the house going more in the direction of the original painting that inspired the house's design. "The Story of Joseph" by Biagio d'Antonio (after 1482)

Closeup


This entails changing the capitals from white to gold and adding a marble finish to the columns. As well as changing the trim color from Terracotta brown to a blue/gray.
Here are the new columns primed with an epoxy primer ready to be “marbleized” (Missing their bases)

For the gold finish on the capitals I first thought of gold leafing them. But I was daunted by the idea of that much leafing on such a complex surface. I also considered gold plating them with either vacuum metalizing or a silver nitrate, but this technique creates a mirror like finish which is often tricky to tone down, not to mention expensive. So I did some experiments with gold paint finishes and settled on “gold” and “brass” Krylon spray paint and to give it more depth I finished them with a coat of amber shellac. This is similar to how the fireplace cover was treated, just using a copper color.

Since, at the last Pennsic, because of an approaching storm we had to pack hastily , many items suffered cosmetic damage. To prevent this and to assist in a more efficient packing, I have made or adapted crates for all of the items that made sense to protect. This includes the smaller ceiling beams, windows and new columns. Here are the column crates.

These are simple 3/8” plywood boxes with corner braces and blocks to rest the column’s on. They will get painted with a latex house paint to protect them from humidity and I’ll add rope handles to the ends. As well as some type of hinge and latch.
Other upgrades include a proper upstairs railing with more tapered columns. A reworked fireplace wall, finished stair well and a couple pieces of furniture for the bedroom.
I'll try to keep this progress updated.