Tuesday, September 7, 2010

Pennsic House: Details

In order to fulfill one of the goals of this project and make this look as much like a real house as possible, I needed to concentrate on the details. As I looked at more and more paintings I needed to settle on architectural elements I could make work both as an 16th century house and in a easy to assemble structure.


 First were arches. Arches were needed for two reasons, one; many of the painting from Italy of the era seemed to have arches and two the rest of Casa Bardicci had arches. If you have arches, you need capitals and columns. This is one of the first things after the wall material I started to source. I kept an eye out on eBay as well as the movie studios here in LA.

Each Movie Studio has a “Staff shop” which is a shop that makes the architectural details for any period of film or television set, from wall textures and molding to capitals and corbels. Most of the staff shops have a cataloged with all of the architectural pieces they offer.

Warner Brothers Staff shop


Now if this project was for a film, with a films budget, it would be built in a very different way. First it would be relatively temporary, made from 1x2 lumber and luan plywood, nailed together with staple & nailguns and the finished scenic paint job would make it look like a completely real structure. Well I would not be able to afford all of the normal Hollywood tricks and my structure needed to be more robust and reusable, but I should be able to pull of many of them, including hiring a couple of really good “scenic” painters to add the finishing touches to the house.

It would turn out that tapered columns were too expensive, especially since I needed 7 of them, so I settled on schedule 40 PVC pipe. The capitals I bought from Worthington Mill works. http://www.worthingtonmillwork.com/products.html
I bought one of their Roman Corinthian decorative capitals and made an RTV silicone mold with a Hydrocal (Like plaster of Paris but stronger) outer shell or Jacket of the capital. I then cast lightweight copies using a 2 part urethane plastic and filled these with the same 2.5 lb. Density foam I used on the beams.

Original fiberglass capital (brown piece added)
Silicone mold with Hydrocal Matrix

Since I had a second floor, I needed stairs. These would be placed on the opposite end from the arches facing the lake. In front of the stairs was a wall, fabricated from the 1” PVC & foam board.

Here are the stairs, traditionally built with 2x10’s and 1x8 pine. (These are by far the heaviest single element of the house. I had to install them myself a few times, but easier to install them with 2-3 people.)

Early on I decided the downstairs needed a fireplace. In many of the period paintings you see a fireplace, I also noticed sometimes there was a cover, over the entire opening of the fireplace. This appears to be a “summer” cover or installed when the fireplace was not in use. The way they are painted it appeared t be a metal cover with slide bolt style latches.

As I had a great deal of space under the stairs, this would be the perfect solution to getting behind the wall to get to under the stairs for “mundane” storage. So using the 1" PVC skinned foamboard I fabricated a fireplace onto the back wall. Again the pieces were bonded with WeldOn and temporarily held together with masking tape till the solvent cement set. For the details I used a plastic foam trim purchased from Lowes and bonded it with WeldOn to the foamboard. I added some plastic copies of small “carved stone” corbels left over from another project, then vacuum formed two corner pieces to finish off the effect. After using the Locktite caulk/ adhesive to fillet any seams, the fireplace and wall where then given a coat of “Featherfill” to add a bit of “plaster texture”. “Featherfill” is a polyester based sprayable build up coating used in automotive body shops to fill in small surface imperfections over large areas.


Here is the fireplace wall fitted in front of the staircase.

(The barrel is to become a "Jockey box" for the beer keg that will be located beneath the stairs.
The side table it’s on is a stand in for one of the correct period I’ll build)


I also noted in 15th & 16th century paintings, that the corbels most often were longer across the ceiling than down the wall, something that is the opposite in later architecture. I found a set of 2 oak corbels on ebay for about $75 and I added some additional pieces of wood to make them work horizontally (instead of the intended vertical orientation) Again using RTV silicone, I made a mold, this time with a wood “jacket” or matrix and cast these in the same manner as the capitals.
Primed cast plastic corbel & wood fascia pieces.

Because silicon is rather heavy and has little surface tension, it flows into every tiny detail of the surface being molded. Because of this it will faithfully capture all the detail and nuances of any given surface. Also silicone usually doesn’t stick to anything, with the exception of itself and glass. This is why, in the movie industry, we use it as the default mold material to make copies of many things.

The resulting corbels have all the wood grain detail of the original oak corbel and once painted will be practically indistinguishable from the real thing.


To attach the corbels I embedded a piece of aluminum “T” material in the top of the corbel and made a “shoe” from some steel angle and strap stock, that this aluminum could slide into. This meant no tools for installation. As these slid in, they also trapped the fascia pieces I made to hide the metal brackets and 2x10’s of the main frame.

Sunday, September 5, 2010

Talents I have seen: Larry Robinson - Inlay

From time to time I’ll post links to great craftsmen out there. Many have skills different from mine, many are much better at anything I have tried. However every once and a while I find some guy who’s done something that makes anything I have ever done well, look like a feeble attempt!


Here is one such guy. http://robinsoninlays.com/
Here are just a couple of photos of his inlay work. But please, go to his site and see how he got here. It is quite impressive. http://robinsoninlays.com/Lindisfarne/


The term world class is often over used. It is a shame, because Larry Robinson is the definition of "world class".

Pennsic House: Floor & Walls

My original plan was to use plastic pallets to make up the floor, this would keep weight down and minimize complexity. After a few design iterations I realized it would be much better to just build a proper floor. I created cross beams for the floor structure from 2”x4”- 16ga. (.062”) steel tube and welded 2x4 joist hangers on 24” centers. On each end I welded a 4” tall piece of the 4’x4” steel tube with a 6”x6” base plate to create sockets to receive the 4x4 timbers that hold up the ceiling. These 4x4 sockets were also drilled to accept a 3/8” bolt from the outside. Around the perimeter I used the same 2x4 steel tube and at each end I cut off 3 walls to render “tabs” that could be bolted through the same holes drilled in the outside of the 4x4 sockets. This way, these steel perimeter tubes would secure the cross beams at set intervals so the 2x4’s set into the joist hangers would not need to be fastened into the hangers. On top of this I used 5/8” plywood as a sub floor. Also bolted to the steel cross tubes.


Now that I had the floor frame built I set up the whole “first floor” Even without the wall skins, the structure was surprisingly stiff.

Eventually I added a ¾” pine board floor over this sub floor.

In every step, I tried to make sure anything a guest would touch or stand on felt solid and secure. I didn’t want the illusion of a “real house” spoiled by a “spongy” floor or “wiggly” post.

The walls needed to be light weight and easy to maneuver as well as stiff. I found a plastic skinned foam board from a local supplier that looked promising.

Since most sheets are a standard 4 foot by 8 foot and I didn’t want seams in the walls at every 4 ft. (This would not look like a real plastered brick exterior) I decided to bond two 4x8‘ panels together edge to edge to make 8x8’ panels. This meant that the thickness of each panel needed a tolerance to be within the skin thickness. The 1” PVC material I found from the local supplier had a skin of foamed PVC .100” thick, which was great, except that in one of my sample sheets the overall sheet thickness varied by .240”, no good. This would mean the skins wouldn’t line up with each other and the skins will not bond with the foam. The other issue was all of the sheets had huge blisters under the skins. No good!
One of the other companies that makes a similar material, but with styrene skins, is “Gilman Brothers” in Gilman CT. (I kid you not) They advertise that their plastic skinned board is available with .015” and .030” skins in overall thicknesses from ¼” to 2”. I called them and the salesmen was very interested in the project and sent off sample next day air. These looked great and his note said he would talk with the president of the company and thought they could supply what I needed especially since I needed 50+ sheets. But then nothing, no returned calls, no emails. Eventually I reached the salesman again and he informed me the material is only stocked in .015” skins and only ½” and ¼”. It would be 8 to 10 weeks for any other thickness and a minimum order. Well I was a bit peeved, I had just wasted 2 weeks with these guys only to find out they wouldn’t/ couldn’t help.

Now I was in trouble and time was against me The material from China was garbage, the other companies overseas had too long a lead time, the one U.S. company I pinned my hopes on didn’t come through and I was having trouble finding another domestic supplier/ manufacturer who had what I needed at a price I could afford.

I eventually found “Laird Plastics”, http://www.lairdplastics.com/ who were very helpful and worked me a great deal on foam board with .030” styrene skins. Since I planned on putting a lightweight metal rim (either a “U” or “J” channel) around each 8x8 panel and was having trouble finding something in 1”, I went to ¾” as there were a number of drywall edgings that would work.

I received the order in a little less than 2 weeks, which was great as Pennsic was about a month away. I bonded the 2 sheets edge to edge by using masking tape to “Pull” the sheets together and applying Weld-On to the two seams. Weld-On is a trade name for solvent cement. Solvent cements/ glues, chemically “melt” the base material and when the solvent evaporates, the joint is nearly as strong as the base material. It comes in different “thicknesses” from water thin to a honey like consistency. It is most commonly used for joining PVC plumbing pipe. Although there are some “universal” solvent cements, the ones for specific plastics (ABS, PVC, Styrene, Kydex ect.) are often stronger.

Once the sheets where cut to size, I glued the galvanized “J” trim around the perimeter of each wall section using a white “Locktite” brand caulk/ adhesive.

The wall panels are attached with “Sidewalk” bolts. These are ¼-20 stainless bolts with a very large diameter / thin head. This way I could drill a 3/8” hole and give myself more “wiggle” room to line things up.

 However even with this “wiggle” room, I knew the chance of lining up multiple holes in multiple 8 foot square panels on a bolt together timber frame house was unlikely. The house is 12’ wide and 23” long, so there are between 1 and 3 panels on a wall. So on each side of the house only the panels at each end of a wall where drilled through the metal “J” edging and bolted to their respective corner 4x4’s. Now this only attached the two end panels on one edge each. For the other edges I left a gap between each panel of ½” and made a separate fascia board with a thin wedge shaped strip or rib running down the center back. The sidewalk bolts went through the fascia and through this “V” shaped “rib” and threaded into the 4x4 between the wall panels.

This way, as the bolts were tightened, they forced this wedge between the ½” gap between the panels and automatically paralleled the panels and wedged them tight, without the need of lining up holes in each panel. This worked quite well in the field and made wall assembly quite fast. As I stated earlier I was not going to use any “wood screws” and so each sidewalk bolt screwed into a threaded metal insert screwed into the wood.

Once all the wall panels were attached the house was extremely rigid.

Friday, September 3, 2010

The Pennsic House: Gutter beams

When you look at houses of the 15th & 16th century they commonly have many small beams resting on larger beams to support the ceiling.

They are also often painted extensively.


I decided to have a painted ceiling, so I needed wood grain beams that either I could paint easily or beams I could add vinyl graphics to. I decided to go the adhesive graphic direction. This meant that a heavy wood texture was not going to work because I would need a relatively smooth surface to apply the graphics to.

Since the beams needed to be lightweight I had planned to make them with a piece of 2" x 2" aluminum “T” and rigid urethane foam. Since the foams surface is soft and easily damaged, I would need to “skin” the beams with something. Now that I was adding a extensive vinyl cover, I could use a preexisting skin and cast my beams into it. It turns out Plastic gutter material is just about the same size and shape as some of the ceiling beams in my research.
I cut end blocks from ¾” plywood and using an industrial hot glue gun, glued these block into each end of the gutter piece. Then, using a basic frame to hold the gutter and the aluminum. The aluminum “T” was cut to remove the “vertical” section and then bent to make a “L” so these beams could be hung over the top of the Box beams I was building. I filled each beam with 500grams of a 2 part expanding (2.5lbs. Density) urethane rigid foam. This foam came from a company in City of industry called Poly-Tech. I've known the owner Tom Lue for 30 years and he always gets you what you need when you need it. I also bought the same type of material (pictured here) from BJB, also in city of industry.


 Each finished beam weighed only 4 lbs. and at 42” in length could hold my 250 lbs with very little deflection. Now I need 40 of them.  I cast up a set and did a test. It proved to be quite rigid.


Now I needed a light weight, yet stiff floor material.

I had been planning on using a plastic skinned foam board for the walls. If you are familiar with “Foamcore”, this material is the same, but in place of the paper “skins” the material is available with either foamed PVC (Centra) or Styrene skins. (I’ll get into this material when I talk about the wall construction)

I tried one of the ¾” thick styrene skinned foam boards with a piece of 1/8” luan over it. This proved to be pretty stiff. Not as stiff a purpose built foam/floor laminate I had found, but considerably cheaper (by a factor of 10)
Here is one complete section assembled.

Thursday, September 2, 2010

Inspiration: The Pennsic house

One of the artist that inspired this house is a fellow by the name of Owain Phyfe.

Last year, Casa Bardicci invited me to their “family night” this is an evening get together at Pennsic where the household has a family dinner and during the evening various musicians show up and perform. We the evening started out with this young couple who happened to wander by the front of the Casa and take notice and ask “what this place was?” One of the people of the house explained it was an artist household and invited them in. As it was, these to young lovers were musicians. In trade for song, dinner was offered and they accepted. Meanwhile, I was sitting in a chair by the lake watching the bats try to catch their evening meal. After a while I became aware of this beautiful music coming from the great hall. In my 21st century brain, I attributed this to someone’s ipod. Coming to my senses and remembering where I was I realized this was someone performing in the hall. It was the most beautiful and fitting music I had ever heard at Pennsic.

After dinner these 3 musicians appeared and smiles all around, shaking hands and exchanging heartfelt greetings. After a minute or two they pulled out their instruments and started to perform. Well words cannot describe the sound of Owain’s voice. It was youthful, yet mature and it transported you to another time and place almost instantly. Sort of a medieval James Taylor, but more. I was hypnotized. I don’t know how long the three of them performed, but it seemed to be over before “I was full”.


I had to have this guys CD’s. Well for the next year, these were just about all I listened to in my truck to and from work. Every time I felt like giving up on the house, I was always reinspired by Owain’s songs.

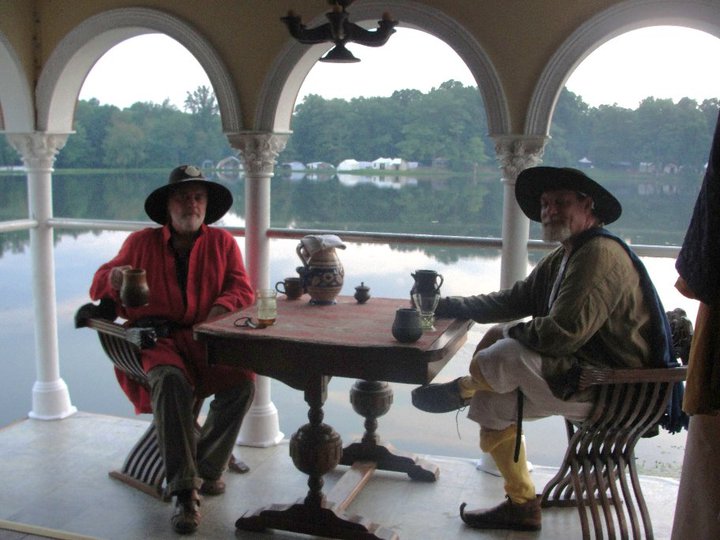
Owain's (Sitting on the left) music can be found here. http://www.owainphyfe.com/


The other musician who performed that night Michael Gartner (On the right), is the artistic director of the group Wolgemut.

Their music can be found here. http://www.wolgemut.net/index.html
Wolgemut plays music that I can only describe as medieval rock & roll.